The Waiting Room feature allows the host to control when a participant joins the meeting. As the host, you can admit attendees individually or hold all attendees in the waiting room and admit them all at once. To host a secure meeting, follow these steps during the meeting creation:
- Require a password
- Enable the Waiting Room
The Waiting Room feature allows the host to control when a participant joins the meeting. As the host, you can admit attendees individually or hold all attendees in the waiting room and admit them all at once.
Require a Password When Scheduling New Meetings
- Open your Zoom application and click on the Schedule icon.
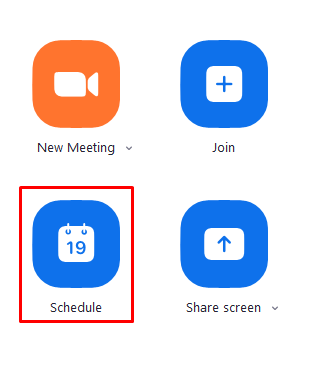
- To set up a password, check the box on the left to Require meeting password.


Enable the Waiting Room
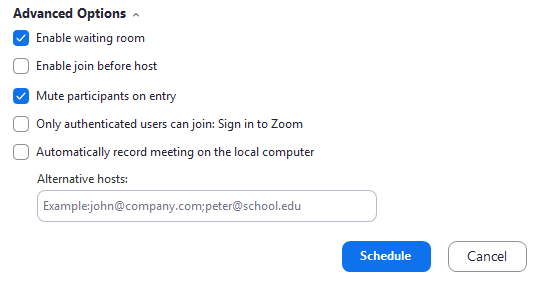
- When scheduling the meeting, click Advanced Options
- Under Advanced Options:
- Select Enable waiting room.
- Ensure Enable join before the host is not selected.
- Select Only authenticated users can join: Sign in to Zoom.
- When you have selected all other options, click Schedule.
Waiting Room Message
Here is the image that participants will see when they are sitting in the Waiting Room.
Note: Any Participant who logs in with something other than an IASTATE Zoom account will automatically be placed in the waiting room.
The following settings give you more control over the meeting:
- Admit or remove waiting room participants
- Remove participants from the meeting when necessary
- Lock the meeting to prevent others from joining
- Disable the Chat
Admit or Remove Waiting Room Participants
- Start your meeting from the Zoom app or the Zoom meeting room link in your calendar.
- As participants join the call, you will see a pop-up message:
- To see all participants in the waiting room, click See waiting room.
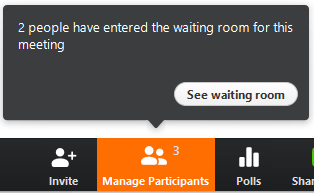
- To see all participants in the waiting room, click See waiting room.
- In the waiting room panel, perform one of the following:
- Click Admit All to admit all participants.
- Click Admit All to allow a single participant into the meeting.
- Click Remove to remove a single participant from the Zoom meeting.
Remove Participants from the Meeting
Follow the instructions to remove a person from a Zoom meeting.
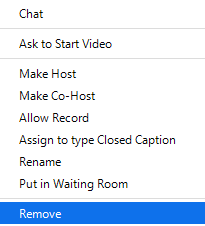
- Click Manage Participants.
- In the Participants panel, place your mouse over a person’s name and click More.
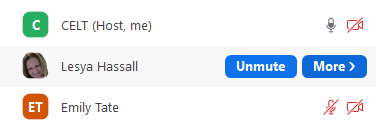
- Click Remove.
Lock the Meeting to Prevent Others From Joining
When you lock your meeting, no additional participants can enter your class.
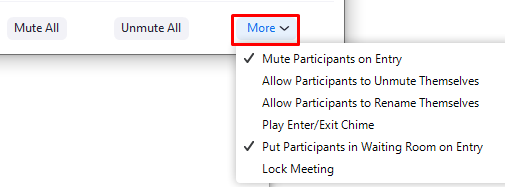
- While in a meeting session, click Participants at the bottom of your Zoom window.
- In the participants’ pop-up box, select More and Lock Meeting. When the meeting is locked, no new participants can join, even if they have the meeting ID and password.
Disable the Chat
Follow the instructions to disable chat in a Zoom meeting.
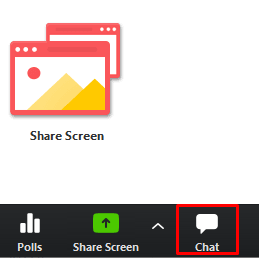
- In the Zoom meeting window, click Chat.
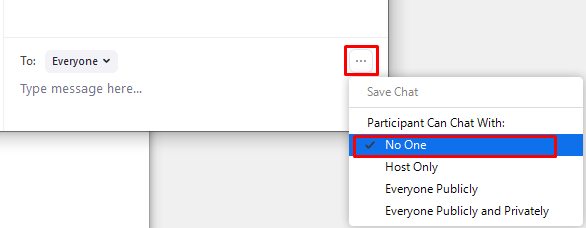
- In the Chat panel, click the three dots.
- In the pop-up window, click No One to prevent participants from chatting in the meeting.
Inviting Students to Your Zoom Meetings
Use Canvas to share your Zoom meeting information with students. Instructors have found the following methods to be effective.
- Send an Announcement containing the meeting information.
- Create a calendar event containing the meeting information. This will be displayed in the Course Summary at the bottom of the Syllabus page.
- If students are expected to complete in-class tasks, include the meeting information in the assignment/quiz instructions.
Using Zoom Breakout Rooms for Teaching
To learn about using breakout rooms in Zoom, view the Zoom help guide.
Recording in Zoom
To create a local recording of a meeting, follow the steps on Zoom’s Local recording guide.
Sharing Your Zoom Recording
To share your Zoom recording with students, upload it to Canvas Studio. If you did not use a 3rd-party captioning service such as 3Play Media, generate closed captions in Studio. Find more information on the Studio Tech page.
Syllabus Statement
Add the statement below to the required technologies section of your syllabus.
This course will use Zoom for synchronous online interactions. Visit the Zoom learning tool guide to view the terms of service, privacy policy, accessibility statement, and steps for getting started with Zoom.
Licensing
This tool is available to departments that have purchased the license.